How to Create a Study Space Without a Desk
You don’t need a traditional desk to study effectively. By repurposing existing furniture like a dining table or window seat, choosing ergonomic seating, and implementing smart storage solutions, you can build a productive study nook anywhere. Focus on lighting, organization, and minimizing distractions to transform any corner into a focused learning environment. With creativity, your entire home can become your classroom.
Let’s be honest: the classic image of a study space involves a sturdy wooden desk, a comfortable office chair, and a built-in bookshelf. But what if your living situation doesn’t include a dedicated home office? What if you live in a studio apartment, a tiny house, or simply share your space with others? The great news is that a lack of a traditional desk is not a barrier to effective studying. In fact, creating a study space without a desk can lead to more creative, flexible, and personalized solutions that fit your unique life and home.
The core principle here is function over form. We’re not looking for a specific piece of furniture; we’re looking for a designated area where your mind can switch into learning mode. This means focusing on four pillars: a stable surface, comfortable posture, organized supplies, and the right atmosphere. By deconstructing what a desk actually provides—a flat plane at the right height, storage proximity, and a psychological “work” signal—we can rebuild it using everyday items and clever hacks. This guide will walk you through every step, from assessing your available nook to selecting the perfect seating and lighting, ensuring you can build a productive sanctuary no matter your square footage.
Key Takeaways
- Assess Your Space & Needs: Evaluate available areas, your study habits, and required materials to design a functional setup that fits your lifestyle.
- Choose Ergonomic Seating: Prioritize proper posture with supportive chairs, floor cushions, or bean bags to prevent strain during long study sessions.
- Maximize Vertical & Hidden Storage: Use wall shelves, over-the-door organizers, and rolling carts to keep supplies accessible without cluttering your floor space.
- Optimize Lighting & Ambiance: Combine natural light with a dedicated task lamp, and consider smart bulbs to adjust color temperature for focus or relaxation.
- Create a Dedicated Surface: Utilize a lap desk, folding table, or a cleared section of a coffee table to create a stable, defined work area.
- Establish a Distraction-Free Zone: Set boundaries with roommates or family, use noise-canceling headphones, and keep your study area visually separate from leisure spaces.
- Personalize for Motivation: Add plants, inspiring art, or a vision board to make your unique study space enjoyable and mentally associated with productivity.
📑 Table of Contents
- 1. Assessing Your Available Space & Study Style
- 2. Seating Solutions: Comfort is Non-Negotiable
- 3. Clever Storage & Organization Hacks
- 4. Lighting and Ambiance: Setting the Mood for Focus
- 5. Building a Distraction-Management System
- 6. Personalizing and Maintaining Your Space
- Conclusion: Your Desk-Free Study Haven Awaits
1. Assessing Your Available Space & Study Style
Before you buy or move anything, you need to play detective in your own home. The first step to creating any successful space is understanding what you’re working with. This isn’t about measuring square footage alone; it’s about understanding your personal rhythms and the physical constraints of your environment.
Identify Potential “Nooks” and Crannies
Look beyond the obvious. That empty corner by the window? A prime candidate for natural light. The area under your staircase? A perfect built-in nook. Even a section of a hallway or an unused part of your living room can be transformed. Consider vertical space—walls are prime real estate for shelves and organizers. Think about multi-use areas: could a section of your dining table be claimed for study during certain hours? The key is to find a spot that feels somewhat separate from high-traffic zones or relaxation areas like your bed or main couch. This physical separation helps your brain associate that specific spot with focus.
Understand Your Personal Study Habits
Are you a marathon studier who needs to be at a surface for 4-hour blocks? Or a sprinter who works in intense 25-minute bursts with frequent breaks? Do you need absolute silence, or does low background noise help? Do you spread out ten textbooks and three notebooks, or do you work primarily on a laptop with a single notebook? Your answers dictate your needs. A marathoner needs superior ergonomic seating and a very stable surface. A sprinter might thrive with a lightweight lap desk they can quickly set up and stow. Someone who spreads out needs more surface area and storage within arm’s reach. Be honest with yourself; designing for your fantasy study self will lead to frustration.
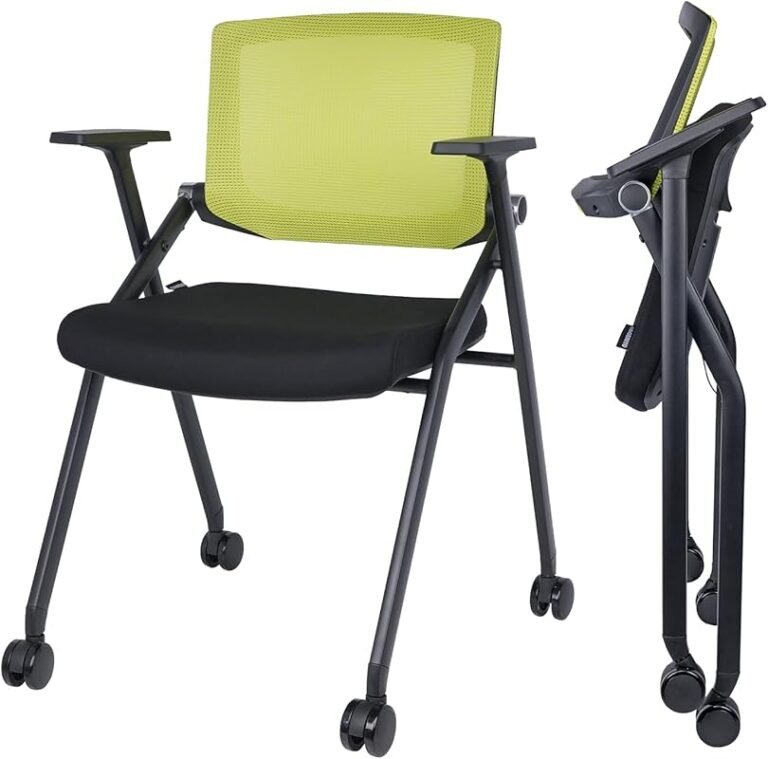
2. Seating Solutions: Comfort is Non-Negotiable
This is the most critical element after the surface itself. Bad seating leads to back pain, neck strain, and fidgeting—all enemies of concentration. Without a desk chair, you must be intentional about where you park yourself.
Visual guide about How to Create a Study Space Without a Desk
Image source: collegeinfogeek.com
The Floor is Your Friend: Cushions and Mats
For many, a well-appointed floor setup is the ultimate flexible solution. A large, firm floor cushion or a Japanese-style zabuton provides a stable, cushioned base. Pair it with a low table or a lap desk to achieve the correct height—your elbows should be at a 90-degree angle or slightly more when your hands are on your work surface. Consider a woven rug or mat to define the space and add a layer of insulation from cold floors. This setup is ideal for low tables, coffee tables, or even a sturdy cardboard box as a temporary desk. It’s also incredibly easy to store away when you’re done.
Bean Bags and Ergonomic Floor Chairs
Modern bean bags have come a long way. Look for ones with structured support that hold their shape, like those filled with memory foam or high-quality polystyrene beads. Some even have built-in back and neck support. Ergonomic floor chairs, which are essentially low-back chairs without legs, are another fantastic option. They promote an open hip angle, which many find better for posture than a traditional 90-degree chair. These can be used at a low table or with a lap desk on your lap. The key is test-fitting: spend 20 minutes in the chair with a book to see if your back feels supported before committing.
Repurposing Existing Chairs
Don’t overlook the chairs you already own. A dining room chair can work perfectly at a dining table or a repurposed sideboard. A sturdy armchair can be paired with a small, adjustable laptop table that slides over the arms. The main issue with regular chairs is often height. If your chair is too low for your surface, use a seat cushion to raise your body. If it’s too high, a footstool can help stabilize your posture, ensuring your feet are flat and your knees are level with or slightly below your hips.
3. Clever Storage & Organization Hacks
Clutter is the silent killer of focus. Without a desk’s built-in drawers, you must create an organized system that keeps essentials within reach but out of sight.
Visual guide about How to Create a Study Space Without a Desk
Image source: schoolhabits.com
Go Vertical with Wall-Mounted Solutions
Walls are your best friends. Install floating shelves or a simple ledge directly above your study area. Use small baskets, cups, or drawer organizers on the shelves to corral pens, highlighters, and sticky notes. A pegboard on the wall beside your seat is a supremely flexible organizer. You can hang shelves, cups, bins, and even a small whiteboard from it, customizing it exactly to your needs. For lighter items, adhesive strips (like Command strips) allow you to mount organizers without drilling holes, perfect for renters.
Mobile & Concealed Storage
A rolling cart or a small, narrow side table with drawers is a game-changer. You can wheel it into position when you study and tuck it away when you’re done. A tall, skinny bookshelf placed next to your seating area can hold all your textbooks and binders. For ultimate concealment, a decorative storage ottoman or a trunk that doubles as seating can hold all your supplies, which you simply lift the lid to access. This “closed storage” approach is psychologically calming, as your space looks tidy the moment you close the lid.
Desktop & Personal Organization
On your actual work surface (whether it’s a lap desk or a table), use a desk pad or placemat to define your workspace and protect the surface. A simple pencil cup, a small tray for your phone and keys, and a document holder for papers you’re actively using are essential. The mantra is: “A place for everything, and everything in its place.” Spend 5 minutes at the end of each session resetting your space. This habit ensures you start every study session with a clean, focused slate.
4. Lighting and Ambiance: Setting the Mood for Focus
Poor lighting leads to eye strain, headaches, and drowsiness. Good lighting, especially a dedicated task light, signals to your brain that it’s time to work. It’s a crucial part of the psychological “desk” setup.

Visual guide about How to Create a Study Space Without a Desk
Image source: accountancylearning.co.uk
Layer Your Light Sources
Never rely on a single overhead light, which often casts shadows. The ideal setup has three layers: 1) Ambient light (the room’s main light, like a ceiling fixture), 2) Task lighting (a direct light on your work surface), and 3) Accent lighting (a soft lamp or string lights to add warmth). Your task light is the most important. Position it on the side opposite your dominant hand (e.g., on the left if you’re right-handed) to avoid casting shadows on your work. An adjustable arm lamp is perfect as it lets you direct light exactly where you need it.
The Smart Bulb Advantage
This is where you can get high-tech on a budget. A simple smart bulb in your task lamp can revolutionize your focus. You can program it to emit a cool, blue-white light (around 5000K) during study sessions, which is proven to increase alertness and concentration. Then, switch it to a warm, soft light (2700K) when you’re done to help your mind unwind. Many smart bulbs also allow you to set schedules and dimness levels. Learning how to connect a smart bulb to WiFi and possibly to a voice assistant like Alexa makes controlling this effortless, letting you change the ambiance without leaving your seat. It’s a small upgrade with a big impact on your study environment’s adaptability.
Natural Light & Glare Control
If your nook has a window, use it! Natural light boosts mood and reduces eye strain. However, direct sunlight causes glare on screens and paper. Use a sheer curtain or a blind to diffuse the light. Position your seating so the light comes from the side or front, not directly behind you (which creates a silhouette) or in front of you (which causes glare). A small plant on your surface can also help connect you to nature, which studies show reduces stress and improves cognitive performance.
5. Building a Distraction-Management System
Your environment will either fight for or support your attention. In a multi-use space, distractions are the biggest enemy. You must be proactive.
Physical Boundaries & Visual Cues
Create a clear visual boundary around your study zone. This could be a small room divider, a tall plant, a different colored rug, or even a simple “Do Not Disturb” sign. When you step into this zone, your brain gets the cue: it’s work time. Conversely, when you step out, it’s break or personal time. If you’re studying in a shared room like a living room, use headphones—not just for sound, but as a physical “do not interrupt” signal. Noise-canceling headphones are a worthy investment for blocking out ambient chatter or TV noise.
Digital Hygiene
Your phone is the ultimate distraction. When you sit down to study, put it in another room, or at the very least, in Do Not Disturb mode and face down. Use website blockers on your computer during study blocks. Have all your tabs closed and only open the ones you need for your task. Treat your digital environment with the same care as your physical one. A cluttered browser with ten open tabs is mental clutter.
Communicate with Housemates/Family
If you share your space, communication is key. Have a clear conversation about your study schedule. Use a visible calendar or a shared digital calendar to block off “quiet hours” in your study nook. A simple, polite sign on the door or a well-placed “studying, please knock” note can work wonders. Most people are happy to accommodate if they know what you need and when.
6. Personalizing and Maintaining Your Space
This is your secret weapon for consistency. A space that feels like yours is one you’ll actually want to use. It also needs to be easy to maintain.
Motivational Aesthetics on a Budget
You don’t need expensive art. Print out inspiring quotes, photos of your goal (like a university campus), or a vision board and frame them with inexpensive thrift store frames. A single healthy plant (like a snake plant or pothos, which are nearly indestructible) adds life and improves air quality. Use a nice notebook and a pen you love to write with—small pleasures matter. Keep a small “gratitude jar” or a motivational token on your surface. Personalization makes the space feel owned and intentional, not like a temporary afterthought.
Easy Cleaning & Upkeep
A dirty, dusty space is demotivating. Since you don’t have a desk to just wipe down, you need a quick routine. Keep a microfiber cloth handy in your storage cart or on your shelf. At the end of each week, spend 5 minutes dusting your surface, your shelves, and your lamp with it. Microfiber cloths are perfect because they trap dust without scratching surfaces. You should also learn how to wash a microfiber cloth properly to keep it effective—usually with warm water and no fabric softener. A clean surface is a clear mind. This tiny habit prevents big clean-up tasks later and keeps your nook perpetually ready for use.
Conclusion: Your Desk-Free Study Haven Awaits
Creating a study space without a desk is not a compromise; it’s an exercise in intentional design. It forces you to focus on what truly matters: a defined area, a supportive posture, organized tools, proper light, and a distraction-free mindset. By repurposing a corner of your dining table, investing in a great floor cushion, mounting a few shelves, and adding a smart task light, you build a system that serves your brain, not your square footage. The most important step is to start. Pick one corner, implement one hack from this guide, and see how it feels. Tweak it. Make it yours. Remember, the goal isn’t to replicate an office catalog image. The goal is to create a signal to your brain that says, “Right here, right now, is for learning.” That signal can be created anywhere. Now, go claim your nook.
Frequently Asked Questions
Is it really possible to study effectively without a traditional desk?
Absolutely. Effectiveness comes from a consistent, organized, and comfortable environment, not a specific piece of furniture. A lap desk at a dining table or a floor cushion by a window can provide all the necessary components for focused work if set up ergonomically.
What is the best seating option for long study sessions?
The best option is whatever maintains proper ergonomics: your feet flat, knees at or below hip level, and your elbows at a 90-degree angle when your hands are on your work surface. A supportive dining chair at a dining table, an ergonomic floor chair with a lap desk, or a bean bag with a low table are all excellent choices for extended comfort.
How can I prevent neck and back strain without an office chair?
Ensure your screen is at eye level (use books to prop up a laptop if needed) and your work surface is at elbow height. Take mandatory micro-breaks every 30 minutes to stand, stretch, and walk around. Investing in a seat cushion for your chair or a well-supported floor chair can make a significant difference in spinal alignment.
What’s the most important storage solution for a small study nook?
Vertical storage. Wall-mounted shelves, a pegboard, or a tall, skinny bookshelf maximize space without consuming floor area. A rolling cart is also crucial as it provides mobile, accessible storage that can be tucked away, keeping your immediate surface clear for work.
How do I stay motivated to use a makeshift study space?
Personalize it! Add a plant, a framed photo that inspires you, or a vision board. The act of setting up your space each morning—even if it’s just placing your lap desk and opening your notebook—can be a ritual that signals the start of your study session, building a powerful habit loop.
What’s a simple way to improve my study nook’s lighting immediately?
Add a dedicated task lamp with an adjustable arm. Position it on the side opposite your writing hand to avoid shadows. For a significant upgrade, replace the bulb with a smart bulb you can set to a cool, blue-white light during study hours to boost alertness, and switch to warm light afterward to help you relax.