Polishing and Waxing a Car A Complete Step by Step Guide
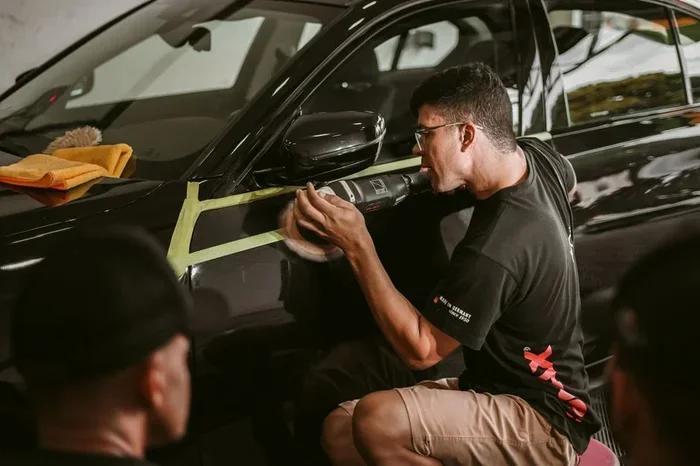
Polishing and waxing a car removes swirl marks, restores shine, and protects your paint from damage. This guide covers every step from prep to final wax, so you can achieve a showroom finish at home. With the right tools and a little patience, your car will look better than ever.
Your car is one of your biggest investments. Over time, the paint takes a beating from sun, rain, road grime, and tiny scratches called swirl marks. Polishing and waxing a car is the best way to bring back that fresh-off-the-lot look. It might sound like a job for a professional, but with the right steps, anyone can do it at home.
In this guide, we walk you through the entire process. You will learn what polishing does, why waxing matters, and exactly how to do both like a pro. Whether you are a beginner or a seasoned car enthusiast, this guide has something for you. Let us get your car looking amazing.
Key Takeaways
- Polishing removes imperfections: It eliminates swirl marks, light scratches, and oxidation from your car’s paint surface.
- Waxing adds protection: A good coat of wax seals the paint and shields it from UV rays, dirt, and water damage.
- Prep work is essential: Washing and decontaminating your car before polishing ensures the best results.
- Use the right tools: A dual-action polisher, microfiber cloths, and quality compounds make the process much easier.
- Wax every 3 months: Regular waxing keeps your car looking sharp and maintains the paint’s longevity.
- Work in shaded areas: Always polish and wax your car in a cool, shaded spot to prevent product from drying too fast.
📑 Table of Contents
Why Polishing and Waxing a Car Matters
Many car owners skip polishing and waxing. They do not realize how much this simple routine can change the look and health of their vehicle. Here is why it is so important.
Your car’s paint has a clear coat layer on top. This layer protects the color underneath. But over time, the clear coat gets damaged. Sun UV rays fade the paint. Bird droppings and tree sap eat into the surface. Even just washing your car can create tiny swirl marks from friction.
Polishing a car uses a mild abrasive to gently remove a thin layer of clear coat. This sands away swirl marks, light scratches, and oxidation. The result is a smooth, reflective surface that looks deep and rich.
Waxing a car goes a step further. It adds a protective layer on top of the paint. This layer shields the clear coat from UV rays, acid rain, bird droppings, and environmental contaminants. Wax also makes the surface slick, so dirt and water slide off more easily.
Together, polishing and waxing do two things. First, they fix what is already damaged. Second, they prevent future damage. It is like fixing a small crack in a wall before it becomes a big hole.
How Often Should You Polish and Wax?
You do not need to polish your car every month. Polishing removes a tiny bit of clear coat, so doing it too often can thin the paint over time. A good rule of thumb is to polish once or twice a year.
Waxing, on the other hand, is safe to do more often. Most experts recommend waxing every three months. If you live in a harsh climate with lots of sun or salt on the roads, you might want to wax every two months.
Some people use a paint sealant or ceramic coating instead of traditional wax. These products last longer, but they do not give the same warm, deep shine that a good carnauba wax does. Many car lovers do both. They use a sealant for long-term protection and a wax for that extra glow.
What You Will Need: Tools and Products
Before you start, gather everything you need. Having the right tools makes the job faster, easier, and more effective. You do not need a lot of fancy equipment, but a few key items make a big difference.
Polishing Tools and Products
- Dual-action polisher: This is the most important tool. It spins and oscillates at the same time, which reduces the risk of burning the paint. A machine polisher is much faster and more consistent than hand polishing.
- Polishing pads: You will need at least two pads. A cutting pad removes more paint and tackles deeper imperfections. A finishing pad gives a smooth, polished look.
- Polishing compound: This is the abrasive liquid that goes on the pad. A compound with a mild cutting action works well for most cars. Heavy-cut compounds are for really damaged paint.
- Microfiber towels: You need several clean microfiber cloths. Use them to wipe off compound residue and to buff the paint after polishing.
- Paint depth gauge (optional): This tool measures how much clear coat you have left. It helps you avoid polishing too aggressively.
Waxing Tools and Products
- Car wax: You can choose from natural carnauba wax, synthetic sealants, or hybrid waxes. Carnauba wax gives the best shine. Synthetic sealants last longer. Hybrid products offer a balance of both.
- Applicator pads: Most wax kits come with foam or microfiber applicators. These spread the wax evenly across the paint.
- Soft microfiber buffing towels: Use a clean, plush towel to remove excess wax after it cures.
- Waxing gloves: These keep your hands clean and prevent fingerprints on the waxed surface.
Other Supplies You Will Need
- Car wash soap and a wash mitt
- Two buckets (one for soapy water, one for rinsing)
- A grit guard for each bucket
- Drying towel (a plush microfiber or chamois)
- Iron remover or clay bar (for decontamination)
- Tape to protect trim and emblems
How to Prepare Your Car for Polishing
Preparation is the most important step in the entire process. If you skip this step, you risk grinding dirt and debris into your paint while polishing. Take your time here, and the rest of the job will go much smoother.
Step 1: Wash the Car Thoroughly
Start with a thorough wash. Use the two-bucket method. Fill one bucket with soapy water and the other with clean rinse water. Place a grit guard at the bottom of each bucket. This traps dirt at the bottom so you do not drag it across your paint.
Wash the car from top to bottom. Use gentle pressure and rinse your mitt often. Work in sections, and rinse each section before moving on. This prevents soap from drying on the paint and leaving water spots.
Step 2: Decontaminate the Paint
After washing, your paint may still have embedded contaminants. These are tiny particles of iron, tar, and industrial fallout that stick to the surface. You can remove them with a clay bar or an iron remover spray.
Spray the iron remover on a section of the car. Watch as it turns purple and dissolves the contaminants. Rinse it off and move to the next section. After using an iron remover, run your hand over the paint (with a plastic bag over your hand). If it feels rough, use a clay bar with a lubricant to smooth it out.
Step 3: Dry the Car Completely
Use a clean, soft drying towel to remove all water. Pat the paint dry rather than dragging the towel across it. Make sure there are no water spots left behind. Any remaining moisture can interfere with the polishing process.
Step 4: Mask Off Trim and Emblems
Use painter’s tape to cover any plastic trim, rubber seals, chrome trim, and emblems. This protects them from the polishing compound and keeps them looking clean. Take your time with this step. It is much easier to tape everything now than to clean up mistakes later.
Step by Step: Polishing Your Car
Now comes the fun part. Polishing transforms your paint from dull and tired to smooth and reflective. Work on one section at a time, about two feet by two feet. This keeps the compound from drying before you can wipe it off.
Step 1: Apply Compound to the Polishing Pad
Squeeze a few drops of polishing compound onto the cutting pad. Spread it evenly across the pad surface. You do not need a lot. A small amount goes a long way.
Step 2: Turn on the Polisher and Apply Light Pressure
Start the dual-action polisher and hold it flat against the paint. Move it slowly back and forth in overlapping passes. Keep the machine moving at all times. Do not let it sit in one spot, or you risk burning the paint.
Use light to medium pressure. Let the machine do the work. If you press too hard, you will remove more clear coat than necessary.
Step 3: Wipe Off the Residue
After polishing one section, use a clean microfiber towel to wipe off the compound residue. Fold the towel into quarters so you always have a clean surface. Check the paint. If it still looks hazy or has swirl marks, repeat the process on that section.
Step 4: Switch to a Finishing Pad
Once the entire car is polished with the cutting pad, swap to a finishing pad. Apply a finishing polish or a lighter compound. Repeat the same process. This step removes any haze left by the cutting compound and brings out the final level of shine.
Step 5: Inspect Your Work
Walk around the car and look at the paint from different angles. Check for any remaining swirl marks or dull spots. If you find any, do a light touch-up with the finishing pad on those areas. When the paint looks uniformly shiny and smooth, you are ready to move on to waxing.
Quick Tip: If you do not have a dual-action polisher, you can hand polish with a microfiber applicator pad. It takes more effort and time, but it works. Just use less compound and apply gentle pressure with circular motions.
Step by Step: Waxing Your Car
Waxing after polishing locks in your hard work and adds a layer of protection. It is the final step that makes your car look incredible and stay protected for months.
Step 1: Choose the Right Wax
There are three main types of car wax. Carnauba wax is a natural wax that gives a warm, deep glow. It is the favorite of car enthusiasts who want that show-car shine. Synthetic sealants are made in a lab and last longer, but they give a slightly thinner, slicker shine. Hybrid waxes combine carnauba and synthetic ingredients for a balance of shine and durability.
For most people, a hybrid wax or a quality carnauba wax works best. Choose one that is easy to apply and remove. If you are new to waxing, look for a paste wax or a cream wax. They are more forgiving than liquid sprays.
Step 2: Apply Wax in Thin Layers
Dip your applicator pad into the wax. Spread a thin, even layer on one section of the car at a time. Use gentle, overlapping circular motions. Do not apply too much wax. A thick layer is harder to remove and can leave streaks.
Work in the shade and on cool paint. If the sun is hitting the car directly, the wax will dry too fast and become difficult to buff off.
Step 3: Let the Wax Cure
Wait for the wax to haze over. This usually takes five to fifteen minutes depending on the product and the temperature. The wax will look dull and cloudy when it is ready to be removed. Check the product instructions for the recommended curing time.
Step 4: Buff Off the Wax
Use a clean, soft microfiber towel to buff off the wax. Fold the towel into quarters and use a fresh section for each pass. Buff in straight lines or gentle circles until the paint is smooth and glossy.
You will feel the difference as the wax comes off. The paint underneath feels slick and looks mirror-like. If you see any wax residue, use a fresh section of the towel and buff it away.
Step 5: Repeat on All Panels
Continue applying and buffing wax one section at a time until the entire car is done. Take your time and enjoy the process. There is something very satisfying about seeing your car transform in front of your eyes.
Quick Tip: After waxing, wait at least 24 hours before washing the car or driving it in the rain. This gives the wax time to fully bond with the paint for maximum protection.
Maintaining Your Car’s Shine Between Sessions
Polishing and waxing a car is a great start, but keeping that shine requires regular care. A few simple habits can make your wax last longer and keep your paint looking fresh.
- Wash your car every two weeks: Regular washing removes dirt and contaminants before they can damage the paint. Use a pH-neutral car wash soap that is gentle on wax.
- Use a quick detailer spray: Between full washes, a quick detailer spray adds a fresh layer of protection and boosts the shine. Just spray, wipe, and go.
- Avoid automatic car washes: The harsh brushes in automatic car washes can strip your wax and create new swirl marks. Stick to hand washing or touchless car washes.
- Park in the shade: UV rays break down wax faster. Parking in a garage or under a tree helps your wax last longer.
- Use a rain repellent: A rain-repellent product adds an extra layer of protection. It helps water bead off the paint and keeps your car cleaner after a storm.
Common Mistakes to Avoid
Even experienced car owners make mistakes. Here are the most common ones and how to avoid them.
- Polishing in direct sunlight: The heat causes the compound to dry too fast, which can leave haze and swirl marks on the paint.
- Using too much compound: More is not better. A small amount of compound works more effectively and reduces the risk of paint damage.
- Skipping the clay bar step: If you do not remove embedded contaminants before polishing, you can grind them into the paint and cause more damage.
- Using a dirty towel: Always use clean microfiber towels. A dirty towel can reintroduce dirt and scratches to your freshly polished paint.
- Waxing over dirty paint: Even a small amount of dust or debris on the paint can create scratches when you buff the wax off.
Expert Insights: Getting the Best Results
Professional detailers share a few tips that can take your results from good to great.
Work in sections and keep track. Many detailers divide the car into zones: hood, roof, trunk, front panels, rear panels, and doors. Complete one zone fully before moving to the next. This ensures consistent coverage and prevents you from missing spots.
Use a paint depth gauge if you are unsure. If you bought a used car or do not know how much clear coat is left, a paint depth gauge can tell you. This helps you decide how aggressive you can be with the polishing compound.
Do a test spot first. Before polishing the entire car, try the compound on a small hidden area. This lets you see how the paint responds and adjust your technique if needed.
Invest in good microfiber towels. Cheap towels can leave lint and scratches. High-quality microfiber towels are soft, absorbent, and safe on paint. They are worth every penny.
Do not rush the curing time. Whether you are polishing or waxing, give each product enough time to do its job. Rushing through the steps often leads to uneven results and extra work.
Consider a ceramic coating after waxing. If you want long-lasting protection, a ceramic coating applied over waxed paint can last up to two years. It creates a hard, glass-like barrier that repels water, dirt, and UV rays far better than traditional wax alone.
Key Takeaways
- Polishing removes defects: It eliminates swirl marks, oxidation, and light scratches by gently removing a thin layer of clear coat.
- Waxing provides protection: It seals the paint and shields it from UV rays, contaminants, and environmental damage.
- Preparation is key: A thorough wash, clay bar treatment, and complete drying set the stage for a flawless result.
- Use quality tools: A dual-action polisher, good pads, and microfiber towels make the process easier and safer.
- Work in sections: Small, manageable sections ensure even coverage and prevent products from drying out.
- Maintain regularly: Regular washing, quick detailer sprays, and re-waxing every three months keep your car looking its best.
- Avoid common mistakes: Do not polish in direct sun, use too much compound, or skip the decontamination step.
Conclusion
Polishing and waxing a car is one of the most rewarding things you can do for your vehicle. It restores the paint, adds deep shine, and creates a protective barrier that keeps your car looking great for months. The process does take some time and effort, but the results are well worth it.
Start with a clean car, use the right products, and work patiently through each step. You do not need expensive equipment to get professional-looking results. A dual-action polisher, a good wax, and a few quality microfiber towels are all you need to get started.
Make polishing and waxing a car part of your regular car care routine. Your car will thank you with a stunning shine and long-lasting paint protection. So grab your supplies, find a shady spot, and give your car the care it deserves.
Frequently Asked Questions
Can I polish my car by hand without a machine?
Yes, you can hand polish your car using a microfiber applicator pad and a quality polishing compound. It takes more time and effort than using a dual-action polisher, but it works well for light swirl marks and minor imperfections. Apply the compound in small circular motions with gentle pressure and wipe off residue frequently.
How long does car wax last?
Traditional carnauba wax typically lasts two to three months, depending on weather conditions and how often you drive. Synthetic sealants can last up to six months or longer. Ceramic coatings can protect your paint for one to two years. Regular washing and proper care help extend the life of any wax or sealant.
Should I polish or wax first?
Always polish first and then wax. Polishing removes imperfections from the paint surface and prepares it for a smooth, even finish. Waxing after polishing seals in that smooth surface and adds a protective layer. Waxing before polishing would just mean you are removing the wax you just applied.
Can I polish a car that has a ceramic coating?
It is not recommended to polish a ceramic-coated car unless you are experienced with the process. Ceramic coatings are hard and durable, but aggressive polishing can damage or remove the coating. If your ceramic-coated car has imperfections, consult a professional detailer for the safest approach.
What is the difference between polishing compound and wax?
A polishing compound contains mild abrasives that remove a thin layer of clear coat to eliminate swirl marks, scratches, and oxidation. Wax is a protective product that goes on top of the paint after polishing to seal and shield it from environmental damage. They serve different purposes and are both needed for a complete car detailing routine.
Is it safe to polish and wax a car in the summer heat?
It is best to avoid polishing and waxing in direct sunlight or high heat. The heat causes polishing compounds and wax to dry too quickly, which can lead to haze, streaking, and difficulty buffing off the product. Work in a shaded area or in a garage where the temperature is moderate and the surface stays cool.