Learn How to Change Your Oil in Your Car Like a Pro
Changing your own oil is one of the simplest and most rewarding DIY car maintenance tasks you can do. With the right tools, a little know-how, and about 30 minutes, you can save money and keep your engine running strong. This guide walks you through every step, from picking the right oil to disposing of the old stuff safely.
Keeping your car in good shape starts with simple maintenance. One of the most important things you can do is change your oil regularly. Fresh oil keeps your engine running smoothly and helps it last for years. Many people pay a mechanic to do this job, but you can learn how to do it yourself at home. It is easier than you think, and it saves you real money over time.
Think about it. A basic oil change at a shop can cost anywhere from 40 to 100 dollars. If you do it yourself, you pay for the oil and filter, and that is about it. You also get the satisfaction of knowing the job was done right. This guide will show you exactly how to change your oil in your car like a pro, step by step. Whether you are a total beginner or have done it a few times, you will find helpful tips here.
Before we dive in, let us talk about what you need. Having the right tools and supplies makes the job much easier. You do not need anything fancy, but you do need the right stuff. Just like setting up a proper workspace for any task, preparation is key. If you want to keep your garage area tidy and ready for projects, you might find it helpful to look at tips on how to organize your workspace, similar to how you would organize a study desk for efficiency.
Key Takeaways
- Regular oil changes protect your engine: Fresh oil keeps moving parts lubricated and prevents costly damage.
- You need basic tools: A socket wrench, oil filter wrench, drain pan, and jack stands are all you need.
- Choose the right oil: Check your owner’s manual for the correct viscosity and type for your vehicle.
- Dispose of old oil properly: Never pour it down the drain. Take it to a recycling center.
- Change oil every 5,000 to 7,500 miles: Follow your manufacturer’s recommendation for best results.
- Safety comes first: Always work on a level surface and use jack stands, never rely on a jack alone.
📑 Table of Contents
Why Changing Your Oil Matters
Oil is the lifeblood of your car’s engine. It lubricates all the moving parts inside and keeps them from grinding against each other. Without clean oil, those parts would wear out fast. Over time, oil breaks down and gets dirty. It picks up dust, metal shavings, and other gunk from the engine.
Dirty oil does not flow as well. It cannot protect your engine the way fresh oil can. When oil gets too old, it turns into sludge. Sludge can clog tiny passages inside the engine. This leads to poor performance, overheating, and even engine failure in worst cases. Regular oil changes prevent all of these problems.
Here is a simple way to think about it. Would you run a marathon without drinking water? Your engine needs clean oil the same way your body needs water. Skipping oil changes is one of the cheapest ways to cause expensive damage. A new engine can cost thousands of dollars. A oil change costs a fraction of that.
How Often Should You Change Your Oil
The old rule was every 3,000 miles, but modern cars have come a long way. Most newer vehicles can go 5,000 to 7,500 miles between changes. Some synthetic oils can even last 10,000 miles. Check your owner’s manual for the exact recommendation for your car. If you drive in harsh conditions, you may need to change it more often.
Harsh conditions include stop-and-go traffic, extreme heat or cold, towing heavy loads, or driving on dusty roads. If any of these sound like your driving habits, stick to a shorter interval. Your engine will thank you for it.
Tools and Supplies You Will Need
Before you start, gather everything you need. Having all your supplies ready keeps the job smooth and stress-free. You do not want to be halfway through and realize you are missing something. Here is what you need:
- New engine oil – Check your owner’s manual for the correct amount and type
- New oil filter – Make sure it fits your specific vehicle model
- Socket wrench and the right socket size – Usually 14mm or 15mm for most cars
- Oil filter wrench – Helps you loosen the old filter without struggling
- Drain pan – To catch the old oil as it flows out
- Jack and jack stands – Never work under a car supported only by a jack
- Funnel – Makes pouring new oil clean and easy
- Gloves and safety glasses – Protect your hands and eyes from hot oil
- Rags or paper towels – For wiping up spills and cleaning the drain plug
- Torque wrench – Helps you tighten the drain plug to the right specification
Think about arranging your tools the way you would set up a workspace for any project. Just like deciding what to put on a study desk to make your work efficient, lay out all your tools in an organized way before you start. This saves time and keeps you focused on the job at hand.
You can find most of these supplies at your local auto parts store or online. Buy a drain pan with a spout for easy pouring later. A good oil filter wrench is a small investment that makes a big difference. And do not forget the funnel. Pouring oil without one is a messy experience you do not want to have.
Step-by-Step Oil Change Guide
Now for the fun part. Let us walk through the actual process of changing your oil. Follow these steps carefully, and you will have a clean, professional-quality oil change in no time.
Step 1: Prepare Your Vehicle
Start by parking your car on a flat, level surface. Turn off the engine and let it cool for about 10 minutes. You do not want to work with scorching hot oil, but you also do not want it completely cold. Warm oil flows better and drains more completely.
Use your car’s jack to raise the front of the vehicle. Place jack stands under the frame for support. Never get under a car that is only held up by a jack. Jacks can slip, and the results could be deadly. Once the car is secure, pop the hood and locate the oil fill cap. This makes it easier for the oil to drain out later.
Make sure you have your workspace ready. A clean, well-lit area is ideal. If you are working in your garage, having a neat setup matters. Think of it like preparing a dedicated area for any project, similar to how you would set up a study desk to be organized and functional before diving into work.
Step 2: Drain the Old Oil
Slide your drain pan under the oil drain plug, which is on the bottom of the oil pan. Use your socket wrench to loosen the plug by turning it counterclockwise. Be careful. The oil may still be warm, and it will start flowing out quickly once the plug is loose.
Remove the plug by hand and let the old oil drain completely into the pan. This usually takes about 10 to 15 minutes. While you wait, take a look at the drain plug and the washer. If the washer looks worn or damaged, replace it before you put the plug back in. A fresh washer ensures a tight seal and prevents leaks.
Once the oil has stopped dripping, wipe the drain plug and the area around it with a rag. Reinstall the plug and tighten it snugly. Use your torque wrench to tighten it to the manufacturer’s specification. Over-tightening can strip the threads, and under-tightening can cause leaks.
Step 3: Replace the Oil Filter
The oil filter catches contaminants and keeps your new oil clean. It is just as important as the oil itself. Locate your oil filter, which is usually near the front or side of the engine.
Place your drain pan under the filter. Use your oil filter wrench to loosen the old filter by turning it counterclockwise. It may be tight, so use some muscle if needed. Be ready for a little oil to spill out when you remove it.
Before installing the new filter, put a thin layer of fresh oil on the rubber gasket. This helps create a proper seal and makes it easier to remove next time. Screw the new filter on by hand until the gasket touches the engine. Then tighten it about three-quarters of a turn. Do not over-tighten, or you will struggle to get it off next time.
Step 4: Add Fresh Oil
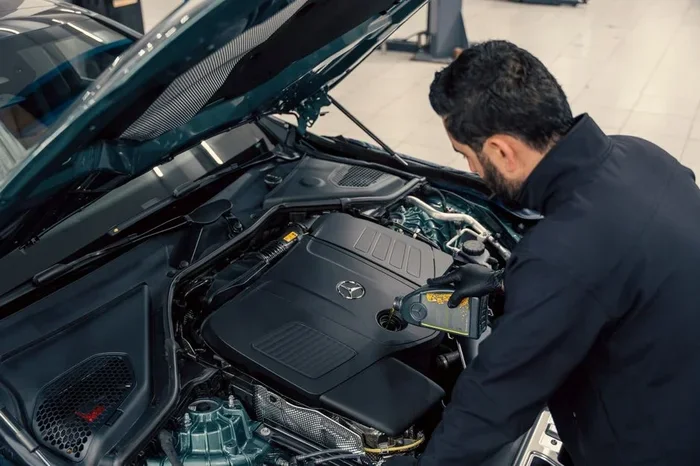
Now it is time to add your new oil. Find the oil fill cap on top of the engine. Remove it and place your funnel in the opening. Pour in the new oil slowly. Check your owner’s manual for the exact amount your engine needs.
Add about three-quarters of the recommended amount first. Wait a minute for the oil to settle, then check the dipstick. Add more oil gradually until the level reaches the full mark on the dipstick. Do not overfill. Too much oil can cause pressure problems and damage your engine.
Replace the oil fill cap, wipe up any spills, and close the hood. You are almost done. Now let us check for leaks and make sure everything looks good.
Step 5: Check for Leaks and Clean Up
Start your engine and let it run for about 30 seconds. This circulates the new oil through the engine. Then turn it off and wait a couple of minutes for the oil to settle. Check the dipstick again to confirm the oil level is correct.
Now look under the car for any leaks. Check around the drain plug and the oil filter. If you see any drips, turn off the engine and tighten the fitting a little more. Once everything looks clean and dry, you are good to go.
Do not forget to dispose of your old oil and filter properly. Pour the old oil from the drain pan into a sealed container. Many auto parts stores accept used oil for recycling. Never pour oil down the drain or onto the ground. It is toxic and harmful to the environment.
Common Mistakes to Avoid
Even experienced DIYers make mistakes. Here are some common errors to watch out for:
- Using the wrong oil: Always check your owner’s manual. Using the wrong viscosity can hurt your engine.
- Forgetting to replace the oil filter: Old filters do not clean oil effectively. Always install a new one.
- Over-tightening the drain plug: This can strip the threads and cause expensive repairs.
- Not checking for leaks: Always inspect under the car after an oil change before driving away.
- Skipping the oil level check: Too much or too little oil both cause problems. Always verify the level.
- Working on an unsteady surface: Always use jack stands and park on flat ground.
Disposing of Old Oil the Right Way
Used motor oil is hazardous waste. It contains toxins that can contaminate soil and water. Proper disposal is not optional. It is your responsibility as a car owner.
Store your old oil in a sealed, labeled container. Many auto parts stores, including AutoZone and O’Reilly, accept used oil for free recycling. You can also check with your local waste management facility for drop-off locations. Some cities even have regular collection events for household hazardous waste.
Never mix old oil with other fluids like antifreeze or brake fluid. This makes it harder to recycle. Keep it separate and store it in a cool, dry place until you can take it to a recycling center.
Final Thoughts
Changing your own oil is a simple skill that pays off big time. You save money, learn more about your car, and gain confidence in handling basic maintenance. Once you have done it a few times, it becomes second nature. You will wonder why you ever paid someone else to do it.
Remember, regular oil changes are one of the best things you can do for your car’s longevity. A well-maintained engine runs better, uses less fuel, and lasts longer. So grab your tools, roll up your sleeves, and give it a try. Your car will thank you, and your wallet will too.
Whether you are a first-timer or a seasoned DIYer, taking care of your car starts with small, consistent steps. Learning how to change your oil is a great place to begin. It sets the foundation for a lifetime of smart car care habits. So get out there, get your hands a little dirty, and enjoy the satisfaction of doing it yourself.
Frequently Asked Questions
How long does it take to change your oil?
For most people, a DIY oil change takes about 30 to 45 minutes. If you are doing it for the first time, give yourself an extra 15 minutes. You will get faster with practice, and after a few times, you will be able to do it in under half an hour.
Can I reuse my old oil filter?
No, you should always install a new oil filter. Old filters are clogged with contaminants and debris. Reusing them means your fresh oil gets dirty faster, which defeats the purpose of the oil change. A new filter costs just a few dollars and keeps your engine protected.
What happens if I overfill my engine with oil?
Too much oil creates excess pressure inside the engine. It can cause oil to leak past seals and gaskets. In severe cases, it can even damage the catalytic converter. Always check the dipstick and add oil gradually until it reaches the full mark.
Do I need to change the oil if I barely drive my car?
Yes, even if you drive infrequently, oil degrades over time. Moisture can build up inside the engine, and additives in the oil break down. Most manufacturers recommend changing oil at least once a year, even if you have not hit the mileage interval.
Is synthetic oil worth the extra cost?
Synthetic oil offers better protection and lasts longer than conventional oil. It performs well in extreme temperatures and resists breakdown. If you drive in harsh conditions or want longer intervals between changes, synthetic oil is a great investment.
What should I do if I notice a leak after changing my oil?
Check the drain plug and oil filter first. They are the most common sources of leaks. Make sure the drain plug is tight and the filter is properly seated. If the leak persists, inspect the oil pan gasket and other seals for damage. Tighten or replace as needed before driving the car again.