Which Terminal Connect First When Charging Car Battery
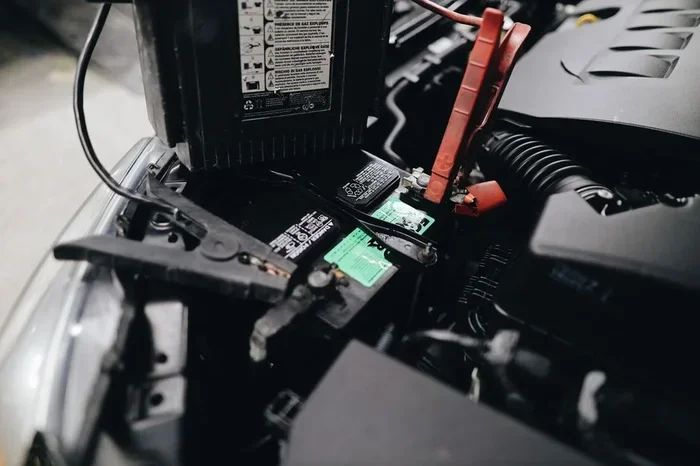
Always connect the positive terminal first when charging your car battery. This simple rule keeps you safe and protects your vehicle’s electrical system from damage. Getting the order right prevents sparks, corrosion, and costly repairs.
Every driver faces a dead battery at some point. Whether you are stranded in a parking lot or working in your garage, knowing which terminal connect first car battery can make all the difference. The order in which you attach your battery cables directly affects your safety and your vehicle’s electrical system.
This guide walks you through the correct connection order step by step. You will learn why the positive terminal comes first, what mistakes to avoid, and how to keep your automotive battery in top shape. By the end, you will feel confident handling any battery charging situation.
Let us start with the basics. Your car battery has two terminals. One is marked with a plus sign, and the other carries a minus sign. Each one serves a specific purpose in the charging process. Getting the sequence right is not just a good idea. It is essential.
Key Takeaways
- Positive terminal first: Always attach the red clamp to the positive terminal before the negative.
- Safety matters: Following the right order prevents sparks and potential battery explosions.
- Check for corrosion: Clean terminal posts before making any clamp connection.
- Disconnect in reverse: When done, remove the negative cable first, then the positive.
- Use the right charger: Match your battery charger to your lead-acid battery type for best results.
- Practice makes perfect: Once you learn the process, connecting your vehicle battery becomes second nature.
📑 Table of Contents
- Understanding Your Car Battery Terminals
- The Correct Order to Connect Terminals
- Why Positive Terminal Comes First
- Step-by-Step: How to Connect Your Battery Terminals
- Common Mistakes to Avoid
- Maintaining Your Battery for Long-Term Health
- Expert Insights on Battery Connection Best Practices
- Conclusion
Understanding Your Car Battery Terminals
Before you touch any cables, you need to understand what each terminal does. The positive terminal is usually marked in red and carries the + symbol. The negative terminal is typically black and marked with a – symbol. These two posts sit on top of your vehicle battery and serve as the connection points for your cables.
What Are Terminal Posts?
The terminal posts are the small metal nubs on top of the battery. They are the contact points where your battery cables attach. Over time, these posts can develop a greenish or whitish buildup called corrosion. This crusty layer can block the electrical connection and cause problems. Before you start any charging session, take a moment to inspect both posts. If you see buildup, clean it off with a wire brush or a baking soda solution.
Clean terminal posts ensure a strong clamp connection. A weak connection can cause your battery charger to work harder than it needs to. It can also lead to intermittent power loss while driving. Taking five minutes to clean the posts can save you a lot of trouble later.
The Role of Each Terminal
The positive terminal carries power from the battery to your car’s electrical system. It feeds the starter motor, lights, and all electronic components. The negative terminal serves as the ground connection. It completes the circuit and allows electricity to flow back into the battery.
When you are jump starting a car or using a portable power source, the order of connection determines where the electrical current flows first. Connecting the wrong terminal first can send a surge through sensitive components. It can also create a spark near the battery. Since batteries release hydrogen gas, a spark can be very dangerous.
The Correct Order to Connect Terminals
The golden rule of battery maintenance is simple. Always connect the positive terminal first. Then connect the negative terminal. When you are done charging or jump starting, disconnect in the opposite order. Remove the negative cable first, then the positive.
Why does this order matter so much? It all comes down to safety. The negative cable connects to the car’s frame or engine block. This creates a ground path. If you attach the negative clamp first and the positive clamp accidentally touches metal parts of the engine, you can create a spark. That spark could ignite gases around the battery.
By connecting positive first, you minimize the risk of accidental sparks. The positive cable is isolated until you place it on the correct post. This gives you control over the charging process from the very start.
Step-by-Step Connection Order
Here is the exact sequence to follow every time you charge or jump start a car:
- Turn off the charger and all electrical devices in the vehicle.
- Identify the positive and negative terminals on the car battery.
- Attach the red clamp to the positive terminal post.
- Attach the black clamp to the negative terminal post or a grounded metal surface.
- Turn on the charger and monitor the charging process.
- When finished, disconnect the black clamp first, then the red clamp.
Write this sequence down if you need to. It is easy to forget under pressure, especially in an emergency situation. Keeping the order in mind will protect both you and your lead-acid battery.
Why Positive Terminal Comes First
The reason comes down to how electrical circuits work. Your car’s electrical system uses the negative terminal as its ground reference. The frame and engine block are connected to the negative side. This means that the negative terminal is already connected to a large metal surface.
If you attach the negative clamp first, you have now connected that clamp to a large grounded surface. When you bring the positive clamp close to the positive terminal, any gap between the clamp and the post can create a spark. That spark could jump across the gap and ignite hydrogen gas.
By connecting the positive terminal first, you limit the exposed live connection. The positive clamp is only live once it touches the correct post. This simple change in order significantly reduces the risk of sparks and short circuits.
Think of it like this. You are making two separate connections. You want the first connection to be the safest one. The positive terminal gives you that safety because it is isolated until you make contact. The negative terminal is already part of a larger circuit, so connecting it first introduces more risk.
Many experienced mechanics follow this rule without thinking about it. But if you are new to working with automotive batteries, it helps to understand the reasoning. When you know why, you are more likely to remember the correct sequence.
Step-by-Step: How to Connect Your Battery Terminals
Now that you know the order, let us walk through the full process. Whether you are using a battery charger at home or jump starting with another vehicle, the steps are the same.
Step 1: Prepare Your Workspace
Start by parking your car on a flat surface. Turn off the engine and all accessories. Open the hood and locate the vehicle battery. Make sure your work area is well ventilated. Batteries can release gases, so good airflow is important.
While you are at it, take a look at your overall workspace. A clean, organized area helps you focus and avoid mistakes. If your garage desk area has clutter, consider clearing it first. Adding a small plant to your desk can improve air quality and help you stay focused while working on projects. You can explore which plant is good for desk to find the best options for your workspace.
Step 2: Inspect the Battery and Cables
Look at the battery closely. Check for cracks, leaks, or bulging. If the battery looks damaged, do not attempt to charge it. Instead, replace it with a new one. Next, inspect the battery cables for fraying or exposed wires. Damaged cables can cause poor connections and even short circuits.
Clean the terminal posts with a wire brush or a battery terminal cleaner. Remove any white, blue, or greenish buildup. This buildup is corrosion and it blocks the flow of electricity. A clean connection ensures your battery charger works efficiently.
Step 3: Connect the Positive Terminal First
Take your red clamp and attach it to the positive terminal post. Make sure the clamp grips the post firmly. You should feel a slight click or snug fit. Do not force it. A secure clamp connection is all you need.
If you are using a battery charger, connect the red positive cable from the charger to this same terminal. Double-check that the charger is turned off before making this connection.
Step 4: Connect the Negative Terminal Second
Now take the black clamp and attach it to the negative terminal post. If the negative post is corroded or hard to reach, you can clamp the black cable to a clean, unpainted metal surface on the engine block. This still provides a proper ground path.
Make sure the clamp is secure. A loose negative connection can cause your charging process to be inconsistent. It can also generate excess heat, which shortens the life of your automotive battery.
Step 5: Start Charging and Monitor
Turn on the charger and set it to the correct voltage for your battery. Most standard car batteries are 12 volts. Monitor the charger during the first few minutes. Look for any unusual heat, sparks, or smells. If anything seems wrong, turn off the charger immediately and disconnect the cables in reverse order.
Good lighting helps you see what you are doing clearly. After spending time under the hood, you will likely return to your desk to handle paperwork or computer work. Having a proper desk lamp that is easy on your eyes makes a big difference. You can check out which desk lamp is good for eyes to find a lamp that reduces eye strain during long work sessions.
Step 6: Disconnect in Reverse Order
Once the battery is fully charged, turn off the charger first. Then disconnect the black negative clamp. Finally, remove the red positive clamp. This reverse order is just as important as the connection order. It prevents sparks from occurring near the battery.
After you finish, take a moment to tidy up your workspace. A well-organized environment boosts productivity and keeps tools within easy reach. Adding an indoor plant to your office desk can create a more pleasant and calming atmosphere. Consider learning about which plant is good for office desk to choose the best greenery for your space.
Common Mistakes to Avoid
Even experienced drivers make mistakes when connecting battery terminals. Here are the most common errors and how to avoid them.
Connecting the negative terminal first. This is the number one mistake. It creates a direct path for sparks to reach the battery. Always positive first, negative second.
Ignoring corrosion on terminal posts. Corrosion builds up over time and blocks the electrical connection. Clean the posts before every charging session. A simple mixture of baking soda and water works well for this.
Using the wrong charger settings. Setting your battery charger to the wrong voltage can damage your lead-acid battery. Always match the charger output to your battery specifications.
Charging a damaged battery. Cracks, leaks, or bulging mean the battery needs replacement. Do not try to charge a damaged battery. It can be dangerous and will not hold a charge anyway.
Forgetting to turn off the charger before disconnecting. Always power down the charger first. This prevents voltage spikes that can harm your vehicle’s electrical system.
Rushing the process. Taking shortcuts with your battery terminals can lead to poor connections or safety hazards. Follow each step carefully and you will get consistent results every time.
Maintaining Your Battery for Long-Term Health
Connecting the terminals correctly is only part of the equation. Regular battery maintenance keeps your vehicle battery healthy and extends its lifespan. Here are some tips to keep in mind.
Check your battery terminals every few months. Look for signs of corrosion or loose connections. Tighten any clamps that feel wobbly. A loose clamp connection can cause starting problems and drain your battery faster than normal.
Keep your battery clean. Wipe down the top of the battery case with a damp cloth. Dirt and moisture can create slow discharge paths that drain your battery over time. If you want to improve your overall workspace, a small desk plant can help purify the air and create a more pleasant environment. Learning about which plant is good to keep in office desk can help you pick the right one for your space.
If your car sits unused for long periods, consider using a trickle charger. This low-voltage power source keeps the battery topped off without overcharging it. It is a great way to maintain battery health during long trips or seasonal storage.
Also, be mindful of what draws power from your battery when the engine is off. Leaving lights, the radio, or accessories on can drain a fully charged battery quickly. Make it a habit to turn everything off before you switch off the engine.
When the time comes to replace your battery, choose one that matches your vehicle’s specifications. The terminal posts on a new battery should be the same size as your old one. This ensures a proper fit for your cables and clamp connection.
For those who work from home and spend long hours at a computer, proper lighting is essential. After a morning of car maintenance or any physical task, switching to a comfortable workspace setup helps reduce fatigue. Understanding which indoor plant is good for office desk can also improve your work environment and overall well-being.
Expert Insights on Battery Connection Best Practices
Automotive professionals emphasize that the connection order is not just a suggestion. It is a safety protocol. Every mechanic learns this rule early in their training, and it becomes second nature. The principle behind it is simple but powerful: control the electrical path from the very first connection.
One pro tip from experienced technicians is to always carry a portable battery charger in your trunk. These compact power sources can jump start your vehicle in minutes. They also allow you to charge a dead battery without needing another car. Just remember to follow the positive-first rule every single time, regardless of whether you are using a portable unit or a traditional charger.
Another expert recommendation is to apply a thin layer of petroleum jelly or battery terminal grease after connecting the cables. This coating protects the terminal posts from future corrosion. It also keeps the clamp connection secure and reduces resistance in the electrical path.
Think of the connection process like making a proper clamp connection on any device. Whether you are setting up a headset or connecting battery terminals, the principle remains the same. Make sure each connection is clean, secure, and made in the correct order. For instance, when setting up communication devices, following the right steps matters just as much. Learning how to connect Plantronics headset to desk phone follows a similar logic of making intentional, ordered connections for reliable performance.
Conclusion
Knowing which terminal connect first car battery is one of the most important skills every driver should have. The rule is straightforward. Always connect the positive terminal first. Then connect the negative terminal. When you are done, disconnect the negative cable first, followed by the positive.
This simple sequence protects your safety, preserves your vehicle’s electrical system, and extends the life of your automotive battery. It prevents sparks, reduces corrosion risks, and ensures a strong clamp connection every time.
Take a few minutes to practice the process. Inspect your terminal posts, clean any buildup, and follow the connection order without exception. Over time, it will become a natural habit. You will never have to think twice about it again.
Your car battery works hard every day to power your vehicle. Treat it well with proper battery maintenance and the right charging process, and it will keep you running reliably for years to come.
Frequently Asked Questions
What happens if you connect the negative terminal first?
Connecting the negative terminal first can create a spark near the battery. Since batteries release hydrogen gas, that spark can be dangerous and potentially cause an explosion. Always connect the positive terminal first to minimize this risk and keep the charging process safe.
Can you charge a car battery while it is still connected to the car?
Yes, you can charge a car battery while it remains connected. Just make sure the charger is turned off during the connection process. Follow the positive-first rule and use the correct voltage setting. This is the standard practice for most drivers and works well for routine battery maintenance.
How do you know if your car battery has corrosion?
Look for a white, blue, or greenish powdery buildup on the terminal posts or around the cable clamps. This is corrosion and it blocks the electrical connection. If you notice it, clean the posts with a wire brush or a baking soda and water solution before charging or jump starting your vehicle.
What is the difference between positive and negative battery terminals?
The positive terminal is marked with a + sign and usually has a red cover or cable. It delivers power to the car’s electrical system. The negative terminal is marked with a – sign and usually has a black cover or cable. It serves as the ground connection and completes the electrical circuit.
How long does it take to charge a car battery?
Charging time depends on the battery size and the charger’s output. A standard lead-acid battery typically takes 4 to 24 hours to fully charge. A slow trickle charger takes longer but is gentler on the battery and helps maintain long-term battery health.
Is it safe to jump start a car in the rain?
It is generally safe if you take proper safety precautions. Keep all connections dry and avoid standing in puddles. Make sure the battery cables are securely attached and follow the positive-first connection order. If conditions feel unsafe, wait for better weather or call for professional assistance.